Filet Crochet Baby Name: How to Chart Any Name
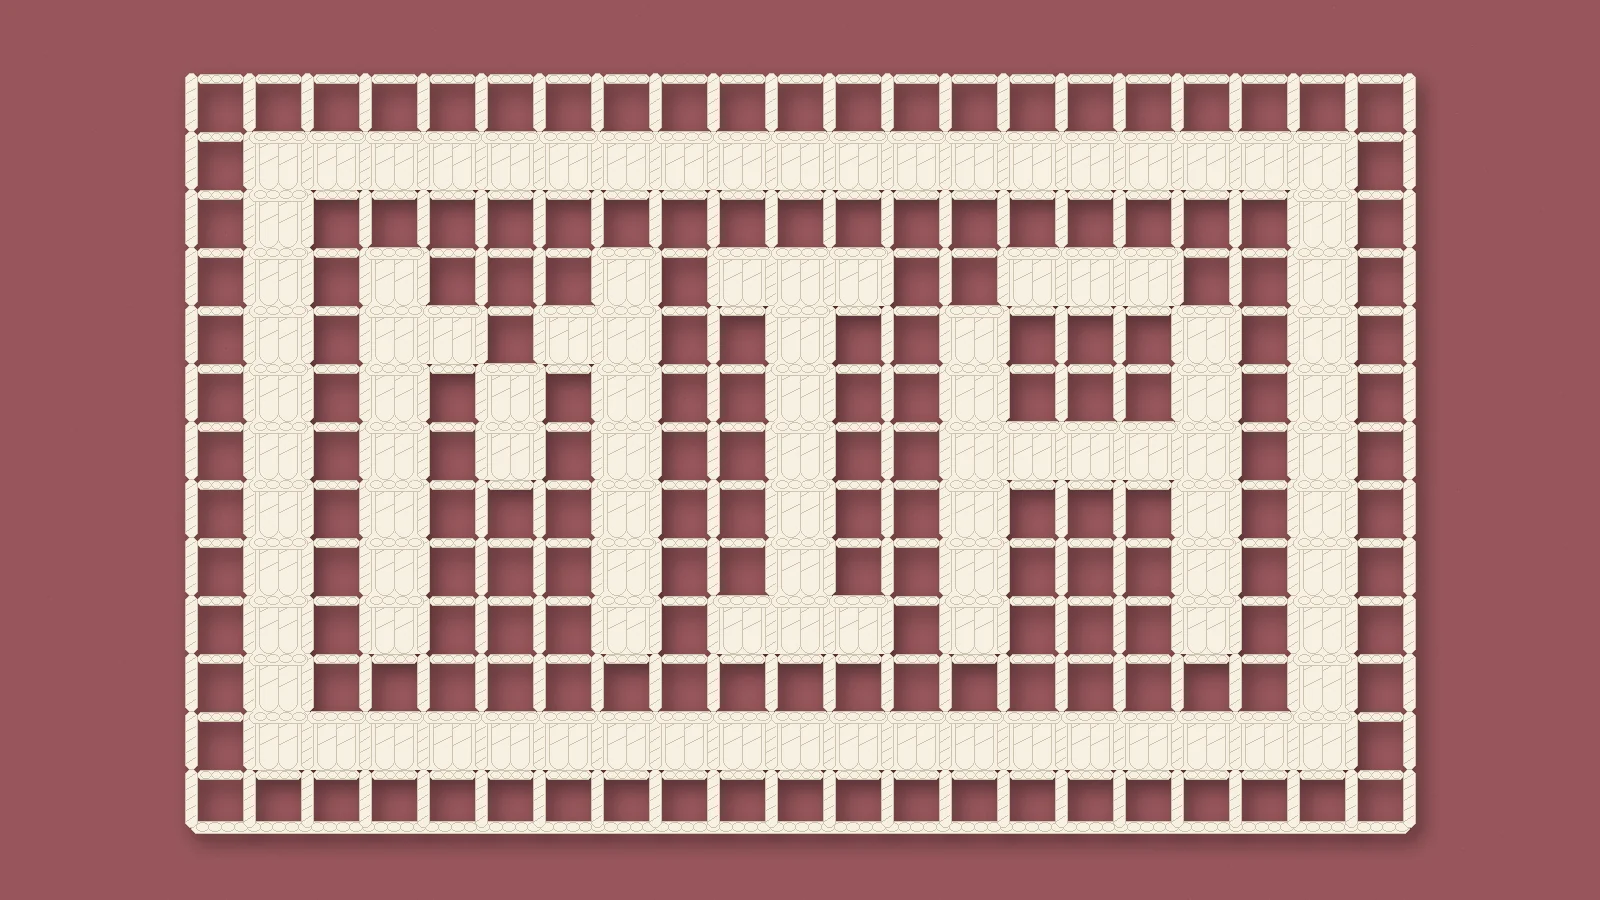
To chart a baby name in filet crochet, draw each capital letter 7 squares tall, leave one column of spaces between letters, add a border, and count the width: letter widths plus gaps plus border. MIA comes to 21 squares wide and 13 rows tall, so you start with a chain of 68. In size 10 crochet thread that is a panel of about 5¼ to 7 inches wide before blocking; in worsted-weight yarn it is wide enough to sew onto a baby blanket.
Below are free MIA and NOAH charts, each with every row written out and a PDF, and the five steps to chart any other name. The charts are designed and counted, not crocheted: the picture above is a drawing of the MIA chart, and the sizes are estimates from other designers’ published gauges. New to blocks and spaces? Start with what filet crochet is.
What you need
- Thread or yarn. Size 10 crochet cotton for a small wall hanging, or a smooth worsted-weight cotton for a blanket panel or a pillow front. Crochet thread is numbered backwards: the smaller the number, the thicker the thread.
- A hook to match. A US 7 steel hook (about 1.5 to 1.65 mm) for size 10 thread, or a 5 mm (H) hook for worsted weight.
- Scissors and a blunt tapestry needle for the ends.
- Spray starch (optional), for a wall hanging that should dry flat and crisp.
- Squared paper and a pencil (optional), to chart a name of your own.
How to chart a name
1. Pick the letter height
These charts use capital letters 7 squares tall. Seven rows put the middle bar of A, E and H exactly halfway, three rows above and three below, and leave room for the slants of K, M, N and Z. Most letters are 5 squares wide; E, F, J and L are 4, and I is 3.
2. Space the letters
Leave one column of spaces between letters. With no gap, M and I touch and read as one shape; two columns look loose.
3. Count the width
- Letters: M is 5, I is 3, A is 5, so 5 + 3 + 5 = 13.
- Gaps: three letters have two gaps between them, so 13 + 2 = 15.
- Border: these panels have a ring of spaces around the letters, a frame of solid blocks, and an outer ring of spaces. That is 3 squares on each side, 6 in all, so 15 + 6 = 21 squares wide.
- Height: 7 rows of letters plus 3 border rows above and 3 below makes 13 rows.
NOAH works the same way: 5 + 5 + 5 + 5 = 20, plus 3 gaps is 23, plus 6 for the border is 29 squares by 13 rows.
To turn the width into a starting chain: each square is 3 stitches wide and shares its edge stitch with the next, so a row of 21 squares is 3 × 21 + 1 = 64 stitches. Row 1 is the outer ring and starts with a space, which needs 3 × width + 5 chains: 68 for MIA, 92 for NOAH. A block start needs 3 × width + 3.
Long names add up quickly: OLIVIA is 5 + 4 + 3 + 5 + 3 + 5 = 25, plus 5 gaps and 6 for the border, so 36 squares. If a name is wider than you want, choose a finer thread, or leave out the block frame and its inner ring, which takes 4 squares off.
Size and gauge
Step 4 is the thread, because it decides how big each square is. Multiply the squares by the width of one square and the rows by the height of one row. Published filet gauges, worked out for both charts:
| Thread or yarn | Hook | Published gauge | MIA, 21 × 13 | NOAH, 29 × 13 |
|---|---|---|---|---|
| Size 10 thread | US steel 7 | 10 squares and 10 rows = 2½ in (Kim Guzman) | about 5¼ × 3¼ in | about 7¼ × 3¼ in |
| Size 10 thread | US steel 7 | 12 squares × 13 rows = 4 in (Chris Rankin) | about 7 × 4 in | about 9¾ × 4 in |
| Size 5 thread | US steel 4 | 10 squares and 10 rows = 3 in (Kim Guzman) | about 6¼ × 4 in | about 8¾ × 4 in |
| Worsted weight | 5 mm (H) | 16 dc × 6¼ rows = 4 in, after blocking (Pia Thadani) | about 15¾ × 8¼ in | about 21¾ × 8¼ in |
A square is 3 stitches wide, so 16 dc to 4 inches makes a worsted square about ¾ inch. Read the thread sizes as before blocking; those patterns do not say. Two designers with size 10 thread and the same hook got squares a third apart, so work a swatch of open mesh about 10 squares by 10 rows, measure it, and use your own numbers.
For a nursery wall hanging, size 10 thread keeps MIA under about 7 inches wide. For a blanket panel, use the blanket’s own yarn weight so the two match in thickness.
Center the name in a panel
Step 5 matters when the panel has a set width, such as matching panels for siblings.
Leftover = panel width − border − name width. Put half the leftover on each side, as extra spaces between the letters and the inner ring.
To make MIA match the NOAH panel at 29 squares: 29 − 6 − 15 = 8, so 4 extra spaces on each side. An odd leftover puts one more square on one side: EVA is 4 + 5 + 5 plus 2 gaps, 16 squares, and 29 − 6 − 16 = 7, so 3 on the left and 4 on the right.
The chart
MIA
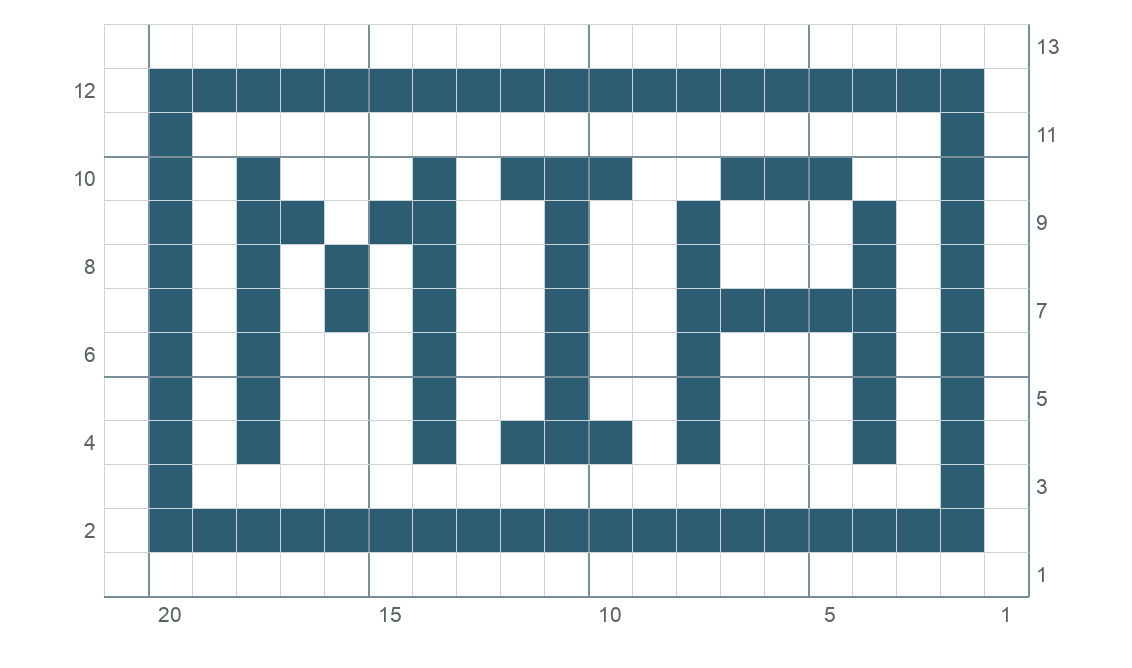
- Size: 21 squares wide, 13 rows tall.
- Foundation chain: chain 68, then dc in the 8th ch from hook (Row 1 starts with a space).
- Every row: 64 stitches, counting the turning chain as one.
- Finished size: about 5.25 to 7 inches wide and 3.25 to 4 inches tall in size 10 thread, before blocking.
NOAH
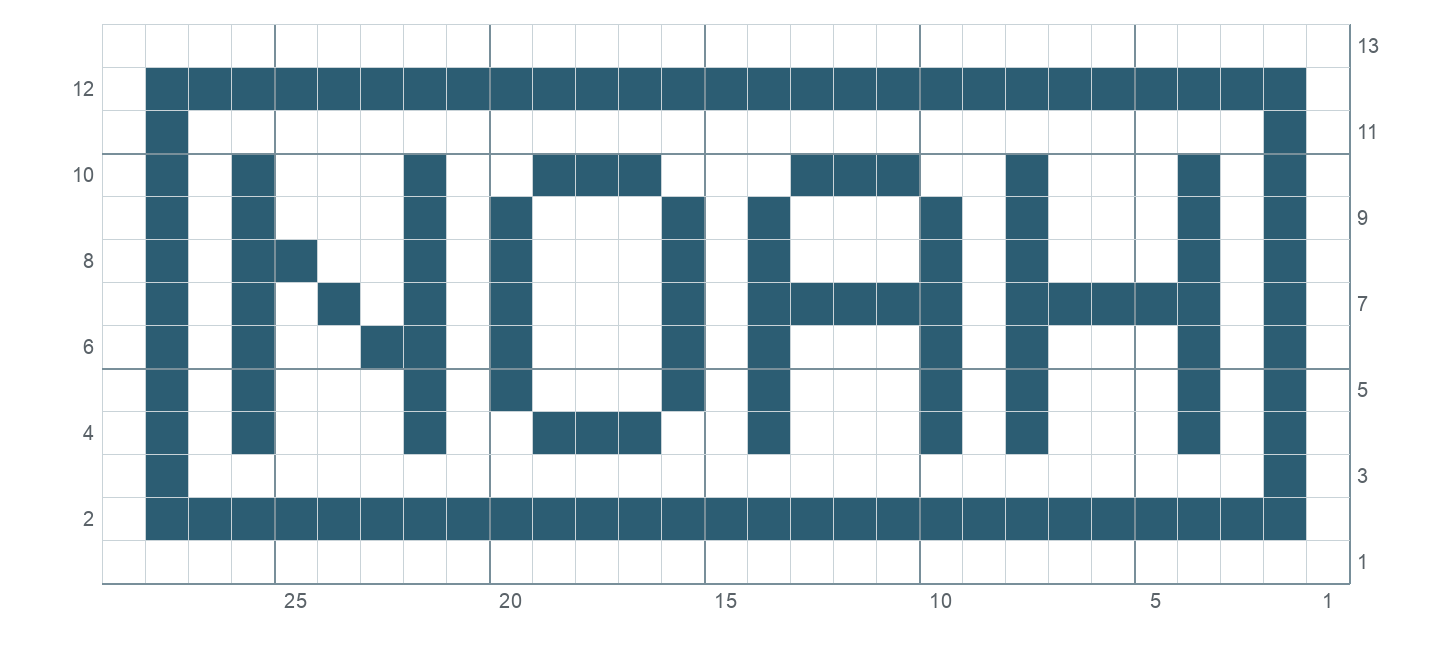
- Size: 29 squares wide, 13 rows tall.
- Foundation chain: chain 92, then dc in the 8th ch from hook (Row 1 starts with a space).
- Every row: 88 stitches, counting the turning chain as one.
- Finished size: about 7.25 to 9.75 inches wide and 3.25 to 4 inches tall in size 10 thread, before blocking.
How to work it
US terms throughout: dc is double crochet, which UK patterns call a treble.
Row 1. Make the foundation chain from the facts. Row 1 is all spaces: dc in the 8th chain from the hook, then (ch 2, skip 2 ch, dc in next ch) to the end.
Turning. A row that starts with a space begins ch 5 (counts as dc and ch 2); one that starts with a block begins ch 3 (counts as dc). Every row of these charts starts on the outer ring, so every row begins ch 5, turn. Work the last dc of each row into the top of the turning chain below.
Reading the chart. Odd rows go right to left, even rows left to right; each row number sits where that row starts.
Blocks and spaces. - A space over a space: ch 2, dc in the next dc. - A block over a space: 2 dc in the ch-2 space, dc in the next dc. - A block over a block: dc in each of the next 3 dc. - A space over a block: ch 2, skip 2 dc, dc in the next dc.
The letters sit on rows 4 to 10. The slants of M and N are single blocks touching only at their corners; work each as a full block.
The front. The side facing you on odd rows matches the chart, so the name reads the right way round there.
Finishing. After the last row of spaces, fasten off and weave in the ends with the tapestry needle.
Row by row
MIA
| Row | Work | Squares in working order | Blocks | Spaces |
|---|---|---|---|---|
| 1 | right to left | 21 sp | 0 | 21 |
| 2 | left to right | 1 sp, 19 bl, 1 sp | 19 | 2 |
| 3 | right to left | 1 sp, 1 bl, 17 sp, 1 bl, 1 sp | 2 | 19 |
| 4 | left to right | 1 sp, 1 bl, 1 sp, 1 bl, 3 sp, 1 bl, 1 sp, 3 bl, 1 sp, 1 bl, 3 sp, 1 bl, 1 sp, 1 bl, 1 sp | 9 | 12 |
| 5 | right to left | 1 sp, 1 bl, 1 sp, 1 bl, 3 sp, 1 bl, 2 sp, 1 bl, 2 sp, 1 bl, 3 sp, 1 bl, 1 sp, 1 bl, 1 sp | 7 | 14 |
| 6 | left to right | 1 sp, 1 bl, 1 sp, 1 bl, 3 sp, 1 bl, 2 sp, 1 bl, 2 sp, 1 bl, 3 sp, 1 bl, 1 sp, 1 bl, 1 sp | 7 | 14 |
| 7 | right to left | 1 sp, 1 bl, 1 sp, 5 bl, 2 sp, 1 bl, 2 sp, 1 bl, 1 sp, 1 bl, 1 sp, 1 bl, 1 sp, 1 bl, 1 sp | 11 | 10 |
| 8 | left to right | 1 sp, 1 bl, 1 sp, 1 bl, 1 sp, 1 bl, 1 sp, 1 bl, 2 sp, 1 bl, 2 sp, 1 bl, 3 sp, 1 bl, 1 sp, 1 bl, 1 sp | 8 | 13 |
| 9 | right to left | 1 sp, 1 bl, 1 sp, 1 bl, 3 sp, 1 bl, 2 sp, 1 bl, 2 sp, 2 bl, 1 sp, 2 bl, 1 sp, 1 bl, 1 sp | 9 | 12 |
| 10 | left to right | 1 sp, 1 bl, 1 sp, 1 bl, 3 sp, 1 bl, 1 sp, 3 bl, 2 sp, 3 bl, 2 sp, 1 bl, 1 sp | 10 | 11 |
| 11 | right to left | 1 sp, 1 bl, 17 sp, 1 bl, 1 sp | 2 | 19 |
| 12 | left to right | 1 sp, 19 bl, 1 sp | 19 | 2 |
| 13 | right to left | 21 sp | 0 | 21 |
NOAH
| Row | Work | Squares in working order | Blocks | Spaces |
|---|---|---|---|---|
| 1 | right to left | 29 sp | 0 | 29 |
| 2 | left to right | 1 sp, 27 bl, 1 sp | 27 | 2 |
| 3 | right to left | 1 sp, 1 bl, 25 sp, 1 bl, 1 sp | 2 | 27 |
| 4 | left to right | 1 sp, 1 bl, 1 sp, 1 bl, 3 sp, 1 bl, 2 sp, 3 bl, 2 sp, 1 bl, 3 sp, 1 bl, 1 sp, 1 bl, 3 sp, 1 bl, 1 sp, 1 bl, 1 sp | 11 | 18 |
| 5 | right to left | 1 sp, 1 bl, 1 sp, 1 bl, 3 sp, 1 bl, 1 sp, 1 bl, 3 sp, 1 bl, 1 sp, 1 bl, 3 sp, 1 bl, 1 sp, 1 bl, 3 sp, 1 bl, 1 sp, 1 bl, 1 sp | 10 | 19 |
| 6 | left to right | 1 sp, 1 bl, 1 sp, 1 bl, 2 sp, 2 bl, 1 sp, 1 bl, 3 sp, 1 bl, 1 sp, 1 bl, 3 sp, 1 bl, 1 sp, 1 bl, 3 sp, 1 bl, 1 sp, 1 bl, 1 sp | 11 | 18 |
| 7 | right to left | 1 sp, 1 bl, 1 sp, 5 bl, 1 sp, 5 bl, 1 sp, 1 bl, 3 sp, 1 bl, 1 sp, 1 bl, 1 sp, 1 bl, 1 sp, 1 bl, 1 sp, 1 bl, 1 sp | 17 | 12 |
| 8 | left to right | 1 sp, 1 bl, 1 sp, 2 bl, 2 sp, 1 bl, 1 sp, 1 bl, 3 sp, 1 bl, 1 sp, 1 bl, 3 sp, 1 bl, 1 sp, 1 bl, 3 sp, 1 bl, 1 sp, 1 bl, 1 sp | 11 | 18 |
| 9 | right to left | 1 sp, 1 bl, 1 sp, 1 bl, 3 sp, 1 bl, 1 sp, 1 bl, 3 sp, 1 bl, 1 sp, 1 bl, 3 sp, 1 bl, 1 sp, 1 bl, 3 sp, 1 bl, 1 sp, 1 bl, 1 sp | 10 | 19 |
| 10 | left to right | 1 sp, 1 bl, 1 sp, 1 bl, 3 sp, 1 bl, 2 sp, 3 bl, 3 sp, 3 bl, 2 sp, 1 bl, 3 sp, 1 bl, 1 sp, 1 bl, 1 sp | 12 | 17 |
| 11 | right to left | 1 sp, 1 bl, 25 sp, 1 bl, 1 sp | 2 | 27 |
| 12 | left to right | 1 sp, 27 bl, 1 sp | 27 | 2 |
| 13 | right to left | 29 sp | 0 | 29 |
Make it a blanket panel, wall hanging or pillow front
Blanket panel. Pin the panel in place and sew it on all the way round with a whipstitch. Yarnspirations’ seaming guide recommends a blunt tapestry needle and the project’s own yarn, which hides the seam best.
Wall hanging. Use size 10 thread and block it with spray starch, as Brittain and Manthey describe: hand wash, blot until just damp, spray one side, pin it to size on a board covered in plastic wrap, spray the other side, and let it dry. Re-block after any wash. To hang it, slide a thin dowel through the top row of spaces, the outer ring, so it never crosses a letter.
Pillow front. Sew the panel onto a plain pillow cover in a contrasting color, which shows through every space so the solid letters stand out.
Troubleshooting
The name reads backwards. You are looking at the back. The front is the side that faced you on Row 1 and every odd row.
A row ends with the wrong number of squares. Count the stitches: 64 a row for MIA, 88 for NOAH. Check the last stitch: it goes into the top of the turning chain, not the dc before it.
The panel slants, waves or curls. Block it: pin each edge straight to the size you measured and let it dry pinned.
The letters look squat. Mesh is not always square: Chris Rankin’s gauge is 12 squares but 13 rows to 4 inches, and Pia Thadani’s worsted is 5 squares but 6¼ rows. Pin the panel slightly taller when you block.
Two letters run together. A gap column is missing; every letter needs one column of spaces before the next.
Free printable PDF
MIA:
Download the free three-letter baby name panel PDF (chart, starting chain and every row, 36 KB).
NOAH:
Download the free four-letter baby name panel PDF (chart, starting chain and every row, 38 KB).
Sources
- Kim Guzman, Windmill Filet: gauges in size 5 and size 10 thread.
- Chris Rankin, Shelf Edging 1, on Ravelry: a second size 10 gauge.
- Pia Thadani, filet crochet butterfly square: the worsted gauge.
- Craft Yarn Council, steel hook and thread sizes: steel hook millimeters and thread numbering.
- Susan Brittain and Karen Manthey, blocking with spray starch: the starch method.
- Becky Skuse, how to filet crochet: smooth cotton, and the last stitch into the turning chain.
- Yarnspirations, methods for seaming crochet: the whipstitch seam.
- LoveCrafts, crochet terms UK vs US: US double crochet is UK treble.